VOiP System
Saltar para a navegação
Saltar para a pesquisa
System information
- IP: 10.20.1.252
- Gateway: 10.20.0.1
- DNS: 10.20.0.5 / 10.20.0.6
- OS: IPBrick 7.1.7
- The following access are in the Bitwarden ARDITI Collection
- Web access: https://echolink.arditi.pt/
- SSH access: ssh operator@echolink.arditi.pt
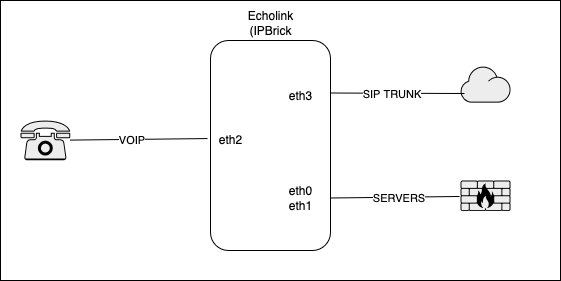
| Interface | Description | IP | VLAN | Status |
|---|---|---|---|---|
| ETH0 | Rede ficticia | 172.20.30.252 / 24 | SERVERS | Off |
| ETH1 | Gestão | 10.20.1.252 / 16 | SERVERS | On |
| ETH2 | Telefones IP | 10.99.0.1 / 24 | VOIP | On |
| ETH3 | NOS | 10.223.218.74 / 30 | SIP | On |
Adding a new phone
To add a new phone to a user, the phone has to be created, the user also needs to be added, and the phone and user associated with each other. For that, follow the "Add a new user" section and the correct "Add a new phone" section based on the type of phone that is being added.
Add a new desk phone
- Log in into the web interface
- Navigate to "Serviço de Diretório" -> "Gestão de Máquinas"
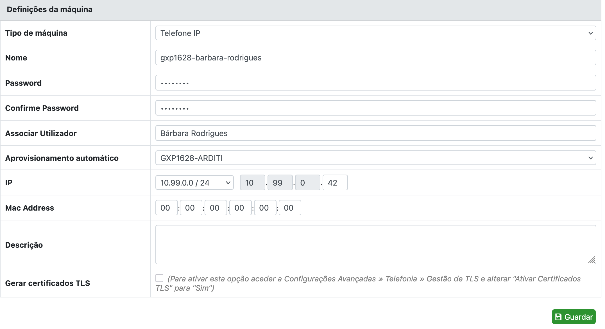
- Click "Novo" and set the following: "Nome" with the name of the phone, "Password" with the password in Bitwarden ARDITI Collection under "EchoLink - Phones", "Aprovisionamento automático" to the model of the phone - ARDITI (e.g. "GXP1628-ARDITI" for the grandstream phones model GXP1628), "IP" with a free IP for the VOIP VLAN (this ip's can be seen on the spreadsheet "IP Distribution" on the "VoIP" sheet), "Mac Address" should be the Mac address of the device which can be seen on the back of the phone.
- Click "Guardar"
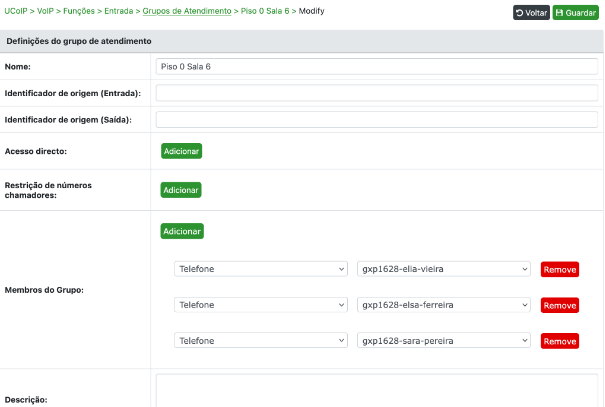
- Navigate to "UCoIP" -> "VoIP" -> "Funções" -> "Entrada" -> "Grupos de Atendimento", and add the new phone to one of the groups
- Click "Guardar"
- Navigate to "Aplicar Configurações"
- Click "Aplicar"
Add a new user
- Go to https://hera.arditi.pt:4444/
- Add the user to the "sg-PhoneAccess" in the AD
- Go to the IPBrick web interface and authenticate
- Navigate to "Serviço de Diretório" -> "Gestão de Utilizadores" -> "Lista de Utilizadores", and click "Sincronizar Utilizadores do AD", afterwards "Sincronizar utilizadores"
- Open the "IP Distribution" file, go to the sheet "VoIP", and define the following: "Name" with the user which will use the phone, "Phone" with the phone model, "Asset" with the asset number from https://library.arditi.pt/ , "Number" with the full contact number, "Extension", "Location" with the floor that person works on, "Pickup Group" with the room that user works in and the IP /24.
- Navigate to "UCoIP" -> "VoIP" -> "Gestão de Utilizadores", and edit the new user and set the following:
- "Endereços Alternativos" with both the extension and the full contact number
- Do not fill up "Identificador de origem"
- "Follow me" with "CAFE Phone", "Conta SIP de Utilizador", and "Telefone do Utilizador" with the phone profile for that user
- "Voicemail ativo" set to "Não"
- Navigate to "Aplicar Configurações" and click "Aplicar"
- Navigate to "UCoiP" -> "Gestão de Telefones" and fill "Identificador de Origem"
Add a new WiFi phone
- Log in into the web interface
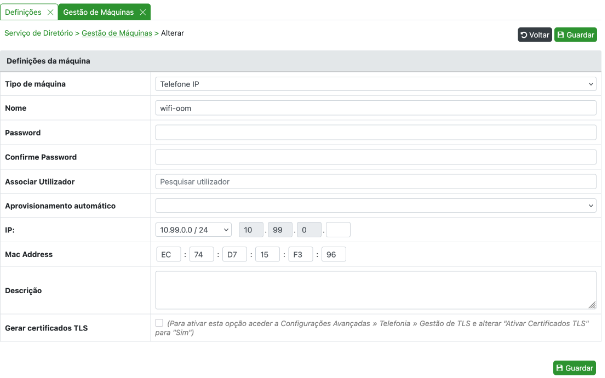
- Navigate to "Serviço de Diretório" -> "Gestão de Máquinas"
- Click "Novo" and set the following: "Nome" with the name of the phone, "Password" with the password in Bitwarden ARDITI Collection under "EchoLink - Phones", and "Mac Address" with the Mac address of the device, which can be seen on the back of the phone.
- Navigate to "UCoIP" -> "Gestão de Telefones"
- Edit the new phone and set the following: "Telefone" should be follow the convention PHONE_MODEL-FIRSTNAME-LASTNAME (e.g. gxo1628-francisco-silva), "Password" the password in Bitwarden ARDITI Collection under "EchoLink - Phones", "Endereços Alternativos do Telefone" should be the internal extension and the full contact number (both can be seen in the IP Distribution Spreadsheet in the sheet "VoIP"), "Identificador de origem" should be the internal extension and the full contact number (both can be seen in the IP Distribution Spreadsheet in the sheet "VoIP")
Debugging
- sngrep (SIP Messages flow viewer)
Grandstream Phones
Change settings in one phone
- Open a local terminal and run the following command:
ssh echolink.arditi.pt -p 22 -l operator -L 8080:<ip of phone>:80and input the password for the user operator (password available in the Bitwarden ARDITI collection) - In the browser, access http://localhost:8080, with user admin and the password of the admin user
- Make the changes wanted, note that local configurations may be overridden by global configurations
Change global settings
- Go to ipbrick web interface
- Navigate to "Configurações Avançadas" -> "Telefonia" -> "Aprovisionamento automático"
- Search for "ARDITI", click on the "eye" icon of the entry "GXP1628-ARDITI"
- Download the file on "Ficheiros de configuração"
- Open the file in a text editor and edit the configuration required
- On the web interface, click on "Alterar"
- Click on "Choose File" on "Ficheiros de configuração", pick the file you edited, and click "Guardar"
Add to phonebook
- Open a local terminal and run the following command:
ssh echolink.arditi.pt -p 22 -l operator -L 8080:<ip of phone>:80and input the password for the user operator (password available in the Bitwarden ARDITI collection) - In the browser, access http://localhost:8080, with user admin and the password of the admin user
- Navigate to "Contacts" -> "Local Phonebook"
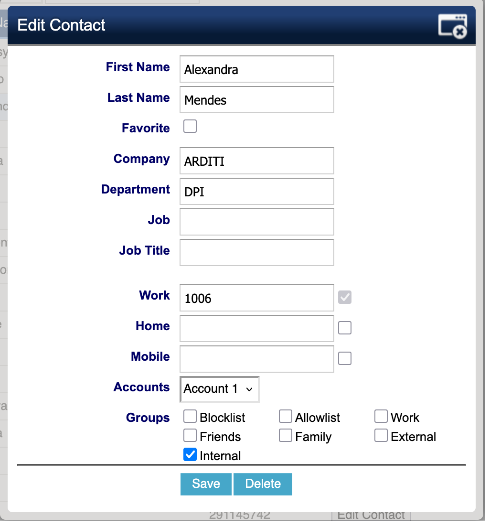
- Add or edit as required
- Navigate to "Contacts" -> "Phonebook management"
- Click "Download XML Phonebook"
- Copy the downloaded file to the server (echolink):
scp phonebook.xml operator@echolink.arditi.pt:~ - SSH into echolink as root
- ssh echolink.arditi.pt -p 22 -l operator
- su root
- Copy the file to the appropriate directoy with the appropriate file name:
cp /home1/_locals/operator/phonebook.xml /home1/_ltsp/tftpboot/agenda/phonebook.xmlcp /home1/_locals/operator/phonebook.xml /home1/_ltsp/tftpboot/agenda/gs_phonebook.xml
Update phone firmware
- Download the firmware from Grandstream website: https://www.grandstream.com/support/firmware , search for the model of the phone (e.g., GXP1628) and click on the version under "General Firmware"
- Extract the .bin file
- Copy the bin file to the server (echolink):
scp gxp1600fw.bin operator@echolink.arditi.pt:~ - SSH into the echolink server
- Copy the file to the root directory of the tftp server:
cp /home1/_locals/operator/gxp1600fw.bin /home1/_ltsp/tftpboot/
